December 8, 2012

Hanging Santa Pictures

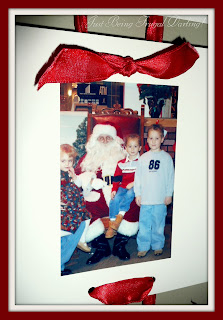
Displaying Santa Pictures
   
My favorite thing to get out every Christmas...our Santa Pictures. 
They are Priceless! 
 I love them all, from the crying ones, the happy ones
and the "why does she make us do this" ones.
I just had to take the time  this morning to share this little idea of how I have
displayed our wonderful family Santa memories each year.
                        All you need is hole punch and some wired ribbin. The first one (top one) make two hole punches about 1 1/2 apart at the top.  ( I just eye it!) 
That is where you add your bow for the top. 
Oh, and I just cut that front part of the card off that they come in
To add a new one each year, I just make two holes at the bottom
of the last year and two holes at the top of the new picture. 
Just tie them together with your ribbin.
And remember these pictures are memories.  So don't try and get the perfect picture. 
The ones that my kids are crying or frowning in are some of the best ones.


 My children are 16, 14 and 12 now! 
And I haven't had to picture for several years now.  :(
The best Christmas gift they could give me this year is a picture
of them with Santa to add to the wall!


October 21, 2011

Cherry Only Dump Cake

  This one is very easy and very good!


2 (21 ounce) can cherry pie filling                   
1 (18.25 ounce) package yellow cake mix
1 cup butter


Lightly grease a 9x13 pan. Preheat oven to 325 degrees F (165 degrees C).

Pour cherry pie filling into bottom of pan. Pour dry cake mix on top.


Slice butter or margarine and put over cake mix.               
Bake for 35 to 45 minutes.
This cake is best when served warm with a side of ice cream.

As you can see I did not use a 9 x 13 pan, I used a casserole dish.
This is really good with a side of ice cream.

October 19, 2011

sugartotdesigns: Vintage Halloween Printable

sugartotdesigns: Vintage Halloween Printable: I go a little crazy with holiday printables, I can't stop making them! Here is another halloween printable, this time a little vintage. Cli...

October 15, 2011

Easy Pumpkin Muffins

 These are so good and moist. 
They are good without anything on them....but they are even better with cream cheese frosting.


Ingredients
1 (18.25 ounce) package yellow cake mix
1 (15 ounce) can pumpkin puree
1 teaspoon ground cinnamon
1/2 teaspoon ground nutmeg
1/4 teaspoon ground cloves
Directions
  1. Preheat the oven to 350 degrees F (175 degrees C). Grease a 12 cup muffin pan or line with paper liners.
  2. In a large bowl, mix together the cake mix, pumpkin puree, cinnamon, nutmeg and cloves until smooth. Spoon equal amounts of batter into the prepared muffin cups.
  3. Bake for 20 to 25 minutes in the preheated oven, until a toothpick inserted in the center of one comes out clean.               
***You do not add any oil or eggs to this recipe.  Just follow the recipe.  The batter will seem a bit stiff when putting them in the muffin pans.  But trust me, they are so moist and yummy!!
Cream Cheese Frosting is really good on these too.

Cream Cheese Frosting  
8 ounces cream cheese, room temperature
8 tablespoons (1 stick) unsalted butter, cut into pieces, room temperature
1 cup confectioners' sugar
1 teaspoon pure vanilla extract

Directions

  1. Place cream cheese in a medium mixing bowl. Using a rubber spatula, soften cream cheese. Gradually add butter, and continue beating until smooth and well blended. Sift in confectioners' sugar, and continue beating until smooth. Add vanilla, and stir to combine.

October 13, 2011

From This, To That! - Hutch

I had a wonderful day going to Garage Sales a couple of weeks ago. 
I have to share one of my wonderful items that I purchased for only.... $ 10.00. 
Okay, so it is falling apart a bit.  But I fell in love with it as soon as I seen it. 
Of course, the first thing in my mind was ..Paint it Black
(My family teases me all the time because I tend to paint a lot of things black.)   

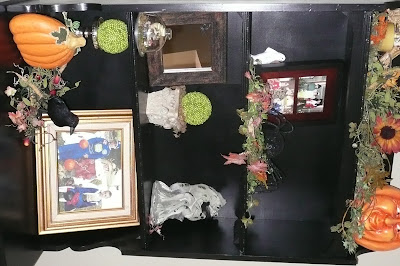
So I got it home, took off the broken pieces on the front and removed the the back board, (which was about to fall off), I removed all of the hardware and began cleaning it up.  I sanded it.  I put primer on it.  I had my Father-in-law cut a new trim piece for the top shelf. (Thanks John) I didn't care for the arches.  I added decorative trim to each shelf front and  painted it all Black
I reused the hardware.  I looked into buying new hardware but I really didn't find anything I liked and I didn't want to spend that much money.  Man, hardware is expensive!

 I love taking an old item and turning it into something wonderful.
I wish I could do this everyday.
I thought about selling it...but as you can see I have found a special place for it in our home.


Star Items
All of the items with a star on it, I  bought them at Garage Sales
I love a gently used item for a cheap price!!

October 12, 2011

Bake Potato Soup

This is one of my family's favorite fall soups.  So I wanted to share it with you. 
I will say it is not low-fat at all!  But it is so good.
3 tbsp butter
1/4 cup flour
4 cups Half & Half
4 baked potatoes, peeled and chunked
1 cup instant mashed potatoes
      (more if you want it thicker)
1/2 tsp salt
1/2 cups shredded Cheddar cheese
 green onions, chopped
1 cup chicken broth
1/2 cup evaporated milk
1/2 cup sour cream
1/2 tsp pepper
1/2 tsp onion salt
4 sliced cooked bacon
Saute' onions in butter until tender, but not brown.  Add flour and let brown, stirring constantly. 
Add 1 cup half & half and stir until well blended.  Add remaining liquid ingredients. Using a potato masher or a pastry blender, coarsely "mash" potatoes.  Break bacon into pieces.  Stir in potatoes, bacon and all remaining ingredients.  Heat thoroughly, stirring occasionally to blend in instant potatoes and  to prevent scorching.
  Garnish with chives.